5 Thursdays Until Christmas ~ Patterned Paper Postcard Ornaments


Hi, Sweet Friends!
There are only 5 Thursdays Until Christmas! For some of you, this is no trouble and you never may give it a thought until this week of Christmas.


This is the 5th of 16 posts will be on making Paper Postcard Ornaments.


Patterned Paper
 Scissors
Ink Pen

Mini-Closepins

String or twine
Glue Stick
 Inks
Inks
8. Bring the two ends together at the top of the twine/string. Tie a small knot at the ends. Slide string under the mini-close pin.
Now they are ready to hang on the Christmas Tree!
Enjoy!
*More Posts below*
The fine print: Please link with love! As with all of our posts, DIY projects featured on Styling With CJD.Sign may not be copied, distributed or reproduced without express written permission.
Love and links are always appreciated!
If you’d like to share this post, please link to this post directly for the DIY tutorial and do not include the instructions in your own post. All photos on this post are by CJD.Sign. Please give credit. Thanks so much! oxo CJ

All photos are by CJD.Sign unless stated otherwise. If you want to use my photo, please give me credit and link to my posts. Thank you, CJD.Sign
 http://stylingwithcjdsign.blogspot.com/2018/10/12-cdts-until-christmas-easy-decorated.html
11 http://stylingwithcjdsign.blogspot.com/2018/10/11-cdthursdays-until-christmas-printed.html 10
09


08 8 Thursdays Until Christmas ~ ABC Ornaments

07 7 Thursdays Until Christmas

05
04
03
02
01
Let’s connect!
Aside from email, social media is another great way to pick up updates from me.
Follow me on Twitter
Like my Facebook page
Pin my Pics on Pinterest
Follow me on Pinterest
Follow me on Instagram
http://customgemcutter.com


#5 Patterned Paper Postcard Ornaments
Supplies:
Brown Cardstock (JoAnn's)

Patterned Paper

Ink Pen

Mini-Closepins

String or twine
 |
| string, this one is from JoAnn's |

 |
| The inks I am using are from Close To My Heart, in Cocoa & Desert Sand.
Directions:
1. Begin by
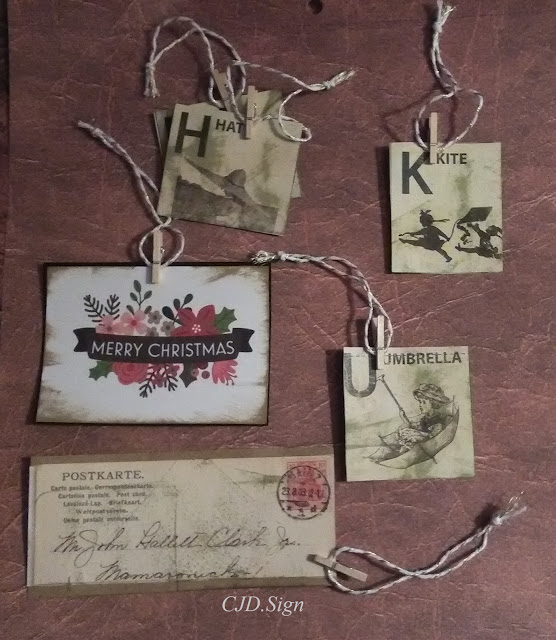
cutting out the 6 shapes from the pattern paper. The Post Card Paper
2. Place the patterned paper shapes on the brown paper or cardstock and trace out the postcard.* Try toys, trees, vintage items, or silhouettes for fun ornaments. 3. Cut out the drawn rectangle of brown paper or cardstock. 4. Glue the Postcard patterned paper to the brown cardstock.  5. Let the squares dry and clip a mini clothespin to the top of each shape, as shown below.  6. Use the ink pads to add color to the postcards, and around the edges to highlight. 7. Cut 6 pieces of twine/string 3" long. |
Now they are ready to hang on the Christmas Tree!

All photos are by CJD.Sign. If you want to use my photo, please give me credit. Thank you.
Enjoy!
*More Posts below*
The fine print: Please link with love! As with all of our posts, DIY projects featured on Styling With CJD.Sign may not be copied, distributed or reproduced without express written permission.
Love and links are always appreciated!
If you’d like to share this post, please link to this post directly for the DIY tutorial and do not include the instructions in your own post. All photos on this post are by CJD.Sign. Please give credit. Thanks so much! oxo CJ

All photos are by CJD.Sign unless stated otherwise. If you want to use my photo, please give me credit and link to my posts. Thank you, CJD.Sign
Enjoy!
 h
h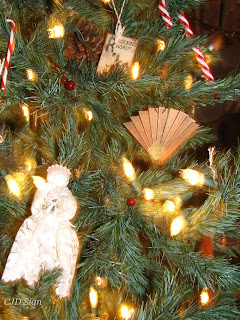

12
http://stylingwithcjdsign.blogspot.com/2018/10/12-cdts-until-christmas-easy-decorated.html11
http://stylingwithcjdsign.blogspot.com/2018/10/11-cdthursdays-until-christmas-printed.html 1009

08 8 Thursdays Until Christmas ~ ABC Ornaments

07 7 Thursdays Until Christmas
06 6 Thursdays Until Christmas ~ Star Paper Ornaments
05
04
03
02
01
Let’s connect!
Aside from email, social media is another great way to pick up updates from me.
Follow me on Twitter
Like my Facebook page
Pin my Pics on Pinterest
Follow me on Pinterest
Follow me on Instagram
http://customgemcutter.com

.JPG)

Comments
Post a Comment