12 CDT's Until Christmas ~ Easy Decorated Balls

There is only 12 Thursdays Until Christmas! For some of you, this is no trouble and you never may give it a thought until this week of Christmas.

This 5th of 16 posts will be on making Easy Decorated Ball Ornaments.
You will need to have a few things before you start this project.
#5 Easy Decorated Ball Ornaments
Supplies:6 clear plastic large filler balls, Walmart or JoAnn's carries these for Christmas.
Christmas berries (Dollar Tree, Walmart, or JoAnn's)
scissors
string or twine
* A few more idea is to use different shaped items in each ball, glitter, fake snow, pine needle tips from a real tree, or beads. The possibilities are endless. I have also seen these done with paint swirled inside of the balls.
 |
| String from JoAnn's |
 |
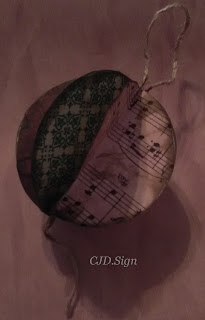
| Clear Plastic Ball filled with foam berries. |
Directions:
- Begin by taking off the metal hanger from the top of the clear plastic ball.
- With scissors, cut the tip bunches of the berries. NOT the metal stems, but the plastic tips. If they are long, cut them about an inch or so long. They need to be able to fit into the top hole of the ball. (or for a variation on this ball, clip off each berry.) see photo

replace the metal top with the loop the hook attaches to. I added a loop on the top with a red & white string from Target, so I could directly hang these on the tree without hooks.

All photos are by CJD.Sign. If you want to use my photo, please give me credit. Thank you.

Enjoy!
|
12
 http://stylingwithcjdsign.blogspot.com/2018/10/12-cdts-until-christmas-easy-decorated.html http://stylingwithcjdsign.blogspot.com/2018/10/12-cdts-until-christmas-easy-decorated.html11  http://stylingwithcjdsign.blogspot.com/2018/10/11-cdthursdays-until-christmas-printed.html 10 http://stylingwithcjdsign.blogspot.com/2018/10/11-cdthursdays-until-christmas-printed.html 10
09
 
06
05
04
03
02
01
Enjoy!
*More Posts below*
The fine print: Please link with love! As with all of our posts, DIY projects featured on Styling With CJD.Sign may not be copied, distributed or reproduced without express written permission. Love and links are always appreciated! If you’d like to share this post, please link to this post directly for the DIY tutorial and do not include the instructions in your own post. All photos on this post are by CJD.Sign. Please give credit. Thanks so much! oxo CJ  All photos are by CJD.Sign unless stated otherwise. If you want to use my photo, please give me credit and link to my posts. Thank you, CJD.Sign
Enjoy!
|
| You May Also Like: Let’s connect! Aside from email, social media is another great way to get updates from me. Follow me on Twitter Like my Facebook page Pin my Pics on Pinterest Follow me on Pinterest Follow me on Instagram Follow me on YouTube You may also like these posts. Our Sponsor: http://customgemcutter.com  |
 h
h

.JPG)

Comments
Post a Comment