11 CDThursday's Until Christmas ~ Printed and Stamped Tags

There is only 11 Thursdays Until Chrismas! For some of you, this is no trouble and you never may give it a thought until this week of Christmas.


You will need to have a few things before you start this project.
 |
| Stamped Tags |
#6 Printed & Stamped Tags
~Multi-pack of tags (at least 6 for each of 3 designs or as many guests, gifts, & 6 ornaments)
~Colored paper in theme patterns that go well together.
~Pre-stamped squares with a Christmas Sentiment (I stamped these Christmas Sentiments years before. If you have stamps, stamp squares and set aside to dry)
~scissors
~glue stick
~Sharpie - thin tip in black
~Calligraphy pen in black (optional)
string or twine
~ink pad (Desert Sand) optional
* Another idea is to use colored pencils and color the stamped design, drawn a 3design, or add more color to the printed paper.
 |
| String & Jute, Twine from JoAnn's |
 |
| Scotch Glue Stick |
  |
| Cocoa & Desert Sand Inks from Close To My Heart. |

1. With the Multi-pack of tags (at least 6 for each of 3 designs or as many guests, gifts, & 6 ornaments)
2. Ink the edges of each tag with the Desert Sand/Tan color ink pad.
3. Use a "Sharpie" Ultra-Thin to write the names. I had a place for a guest, so I added a "Guest" tag. Add as many place tags as you have guests.
4. Cut all the lengths of the string/twine the same length. 6 pieces in total. Tie each of the 6 pieces in a loop.


1. With the Multi-pack of tags (at least 6 for each of 3 designs or as many guests, gifts, & 6 ornaments)
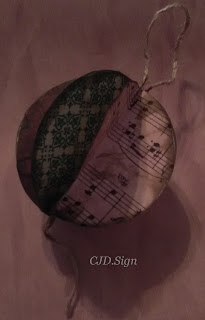
2. Cut the Colored paper smaller than the tags. Don't worry about the corners, they will be cut after gluing.
3. Glue paper to tags.
4. (0ptional) ink the edges of the tags.
5. Cut all the lengths of the string/twine the same length. 6 pieces in total. Tie each of the 6 pieces in a loop.
*Additional tags made from brown cardstock rectangles, glue on a piece of patterned paper, as above, and clip the string loop with mini-clothes pin.

Tag #3
1. Pre-stamped squares with a Christmas Sentiment (I stamped these Christmas Sentiments years before. If you have stamps, stamp squares and set aside to dry)
2. With the Multi-pack of tags (at least 6 for each of 3 designs or as many guests, gifts, & 6 ornaments)
3. Glue paper printed sentiment to tags.
4. (0ptional) ink the edges of the tags.
5. Cut all the lengths of the string/twine the same length. 6 pieces in total. Tie each of the 6 pieces in a loop.
 |
| Tags for Christmas Tree Decorations, Post Cards for Christmas Tree Decorations (later post) |

All photos are by CJD.Sign. If you want to use my photo, please give me credit. Thank you.
Enjoy!
*More Posts below*
The fine print: Please link with love! As with all of our posts, DIY projects featured on Styling With CJD.Sign may not be copied, distributed or reproduced without express written permission.
Love and links are always appreciated!
If you’d like to share this post, please link to this post directly for the DIY tutorial and do not include the instructions in your own post. All photos on this post are by CJD.Sign. Please give credit. Thanks so much! oxo CJ

All photos are by CJD.Sign unless stated otherwise. If you want to use my photo, please give me credit and link to my posts. Thank you, CJD.Sign
Enjoy!
 h
h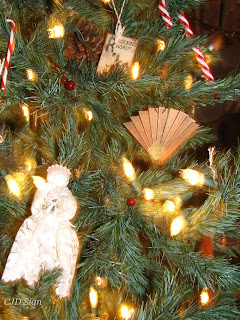

12
 http://stylingwithcjdsign.blogspot.com/2018/10/12-cdts-until-christmas-easy-decorated.html
11
 http://stylingwithcjdsign.blogspot.com/2018/10/11-cdthursdays-until-christmas-printed.html 10
09


08 8 Thursdays Until Christmas ~ ABC Ornaments
06
05
04
03
02
01 Let’s connect!
Aside from email, social media is another great way to get updates from me.
Follow me on Twitter
Like my Facebook page
Pin my Pics on Pinterest
Follow me on Pinterest
Follow me on Instagram
Follow me on YouTube
You may also like these posts.
Our Sponsor:
http://customgemcutter.com
 |
| Emerald on the Dop. |
 |
| Checking the cut meets. |
 |
| Cutting the girdle. |
 |
| Matt faceting an Emerald into an Oval Brilliant. |
 |
| Matt at the lap cutting an Emerald. |
 |
| Matt cutting an Emerald on the lap |
 |
| Aquamarine Emerald Shape Cut |
 |
| Aquamarine Rough Stones |

.JPG)

Comments
Post a Comment