5 DIY Christmas Ball Tutorials Plus Extra Ideas ~ Creative Day Thursdays

Here is an easy DIY Tutorial for you!
How to make decorative Christmas Ball Ornaments.
The top two ball decorations are made from a pre-covered foam ball and the bottom two are from a styrofoam ball.
 |
| A Natural Look |
 |
| I used hemp twine for this first ball and it gave it a natural look and feel |
The First & Second DIY Christmas Balls
(follow the directions for both balls)
 |
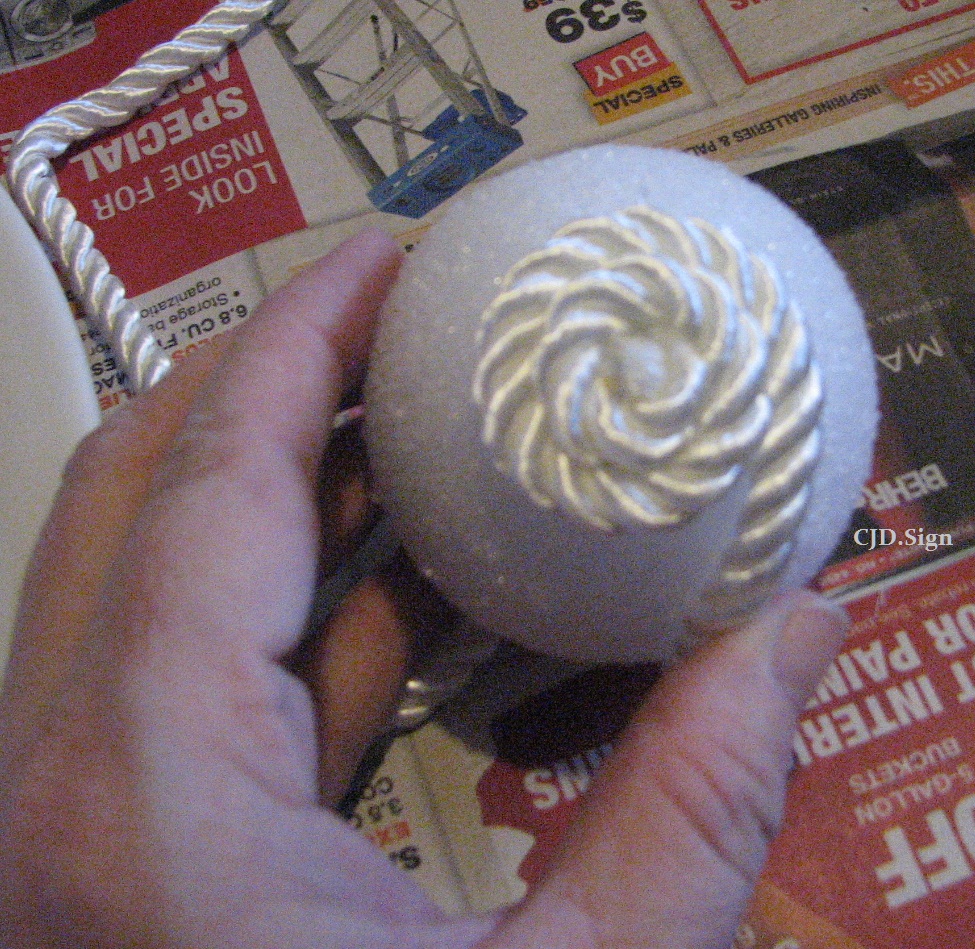
| These two ball tutorials use the Styrofoam balls. You can find these type of balls at any craft store. The first ball shown uses the Hemp Twine in the same manner as the Satin Braid. The hemp is for a natural looking decoration and the satin for a more elegant look.This year we are going for the elegant gold, silver & white theme. I hope you like it as much as I do! |


 |
| Continue till the middle of the ball. At the middle, you will turn the ball over and make the hole for the string hanger. |
 |
| Cut off a 4' piece of metallic cord/twine for the hanger. |
 |
| Poke a hole with a pencil into the top center of the ball. |
 |
| Fill the hole with hot glue from the glue gun. |
 |
| Fold cord/twine in half and put the cut ends into the hole. Let Dry. |
 |
| When hanger glue is dry, continue gluing and wrapping the cord/twine till you come to the end. |
 |
| Go slowly, gluing and wrapping the cord/twine. Hold in place until it is set. |
 |
| To finish this ball, cut the end of the cord/twine close to the ball, with enough cord/twine to tuck down towards hanger. |
 |
| Glue end into center by the hanger. Use the end of the pencil to push the braid/cord/twine down and don't use your finger because the hot glue is very hot and you could burn yourself like I did...not so fun~ |
 |
| Your ball should look similar to this. Top end with the hanger. |
 |
| bottom end with the start point. |
 |
| At this point, let the ball dry/set completely. |

I hot glued a tiny white ribbon bow to finish off the ball at the hanger.
 |
| let this dry completely before hanging it on the tree. |
 |
| The finished Braid Ball |
 | |||
Third Ball Quick DIY
|

 |
| Add the cord, but tie it to the hanger in the ball. Put a dot of hot glue to hold the hanger in the ball. |
 |
| Quickly add a small decoration (I used a glittered snowflake sequin) to the top where you put the hot glue dot. |
 |
| There you have the third Christmas Ball finished. That was an easy one. I have decorated these with ribbon bows, sequins, small pieces of cinnamon stick, tiny glittery silk flowers... the possibilities are endless! |
 |
| These six balls are done and ready for the tree! |
The Forth DIY Christmas Ball
 |
| These Balls were inspired by my love for the Victorian Era. I took small beads and sewed them to ribbon flowers, I made ribbon roses by hand stitching a running stitch one one edge of the ribbon and then pulling the stitch tight to ruffle the ribbon. Then I gathered it up in a round and stitched it closed at the bottom edge. |


Glue the silk rose buds on first; give a layered look. Then I glued the ribbon roses and flowers to the balls on top of the silk rose buds.


 |
| Adding a beaded element made this Christmas Ball my favorite! |
The Fifth and Final DIY Christmas Ball


 |
| Adding bits of ivy and rose buds made this ornament so pretty! |
 | |
| Place a hot glue dot here at the hanger. Then attach the ivy/flower/etc. Let dry for a few minutes. |
Here are a few more I did for examples!  | ||||||||
| Add a Sheer Ribbon Knot, rose bud, strung pearls and part of a floral pick. |
 |
| Add a Sheer Knot with bow ends and strung pearls. |
 |
| Make knots into little bows by scrunching the ends. Very cute when using wire edged ribbons! |
 |
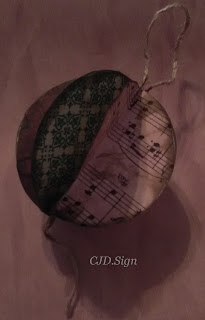
| Add a knot of decorative ribbon. This ribbon is gold, white and has musical notes on it. This is unwired ribbon. |

I hope you got some encouragement to enhance your own Christmas Balls for your Christmas Tree!
Join me tomorrow for some Home Made Christmas Cookies!! And a new tradition of the 12 Days of Christmas Cookies!

 |
| White Hot Chocolate! YUMMY! |
Enjoy!
And A Merry Christmas to you all~
Enjoy!
*More Posts below*
The fine print: Please link with love! As with all of our posts, DIY projects featured on Styling With CJD.Sign may not be copied, distributed or reproduced without express written permission.
Love and links are always appreciated!
If you’d like to share this post, please link to this post directly for the DIY tutorial and do not include the instructions in your own post. All photos on this post are by CJD.Sign. Please give credit. Thanks so much! oxo CJ

All photos are by CJD.Sign unless stated otherwise. If you want to use my photo, please give me credit and link to my posts. Thank you, CJD.Sign
Enjoy!
 h
h

12
 http://stylingwithcjdsign.blogspot.com/2018/10/12-cdts-until-christmas-easy-decorated.html
11
 http://stylingwithcjdsign.blogspot.com/2018/10/11-cdthursdays-until-christmas-printed.html 10
09

07
06
05
04
03
02
01
.JPG)

Comments
Post a Comment