DIY Journal ~ Part 4 Decorated Journal Cover

On to the Decorated Journal Cover FRAME! This has been a long tutorial! Thank you so much for hanging in there with me!
Here is the list of supplies to gather for this
Decorated Journal Cover:
~1 Photo Mat (the size of the front of your journal. Mine is a bit bigger, but that is okay, at 8 x 10. This size really works nice and can be found at any crafts or hobby store.)
~Stickers
~Die cut shapes
~Mirrored Word Elements
~Metal Elements/Charms
~Ribbon
~Stamp Ink (for distressing- Optional)
~Stamped Elements
~Cut out Shapes
~Cut out Words
~Tiny Trinkets
~Ribbon Flowers
~Anything that adds fun to your journal front cover
~Glue Dots
~Tacky Glue
~Glue Stick
~Double Sided Clear Tape
~Scissors
~Clear Gorilla Glue OR Hot Glue Gun with Glue Stick(for the frame to adhere to the Journal)
~Soft Clamps (I used hair clips and paper binder clips)
~4 Heavy Cans or Heavy Books (to keep the pressure on the frame when glued to the Journal)
*NOTE* I grabbed up any little items I had to adorn the front Decorated Journal Cover. So don't limit yourself to just my list. I listed what I used, but it is truly not all I wanted to add! Hubby said, "CJ, Less is More!" No lie! (The next Journal is a Monster Trucks Journal, a personal request from Grandson) :)

On To The Cover!!
 Start on a clean surface and lay out the photo mat.
 Gather up all supplies and have them near.
 Place items on the photo mat in a pleasing way.
 Place items around the photo mat in a pleasing way.
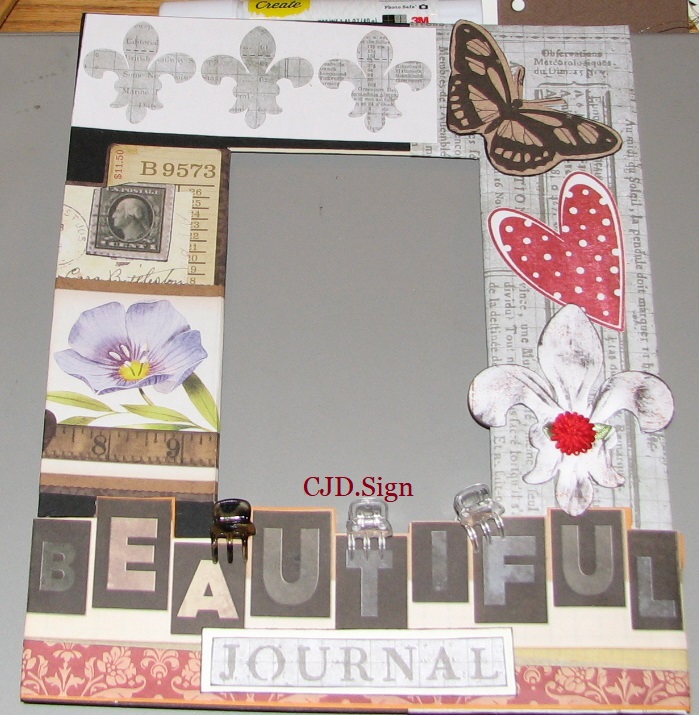
 I chose to line these Fleur de Lis with a Parisian Printed Paper so that the black background would not detract from the boldness of the words at the bottom of the frame.
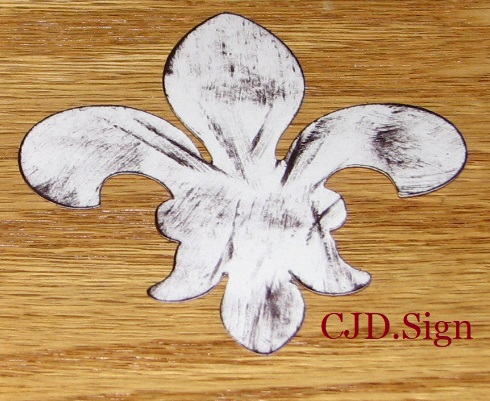
 I used the Cricut to make the 3 Fleur de Lis in the top photo and this large one.
 To make the Fleur de Lis look 3D, outline with a black stamp pad on all edges. Press stamp pad into larger areas of the piece making dark shade. Swipe across the edge of the pad to make lines.
Pinch the center of each flower petal down by it's base. Pinch each of the 3 bottom tips as well. Re-stamp if needed to emphasize the pinches.
 Now, seriously look at the stash of fun things you have set aside and pick out items that will work on the cover. Remember to keep it age appropriate for a child. I put aside the scrabble piece, key, "9", the buttons and many of the elements I had first chosen.

 I prefer to have the paper wrap around the frame for a better finished look. I did not see this until posting here. I think it would also last longer. Use the Glue stick to adhere the paper to the frame.
 The pattern piece was larger than I needed, but worked well using scissors to cut to the paper to the corners of the frame. (see above)
 Continue working the paper where it will be glued.
 This is how the mat looked before the next elements. Let this dry.
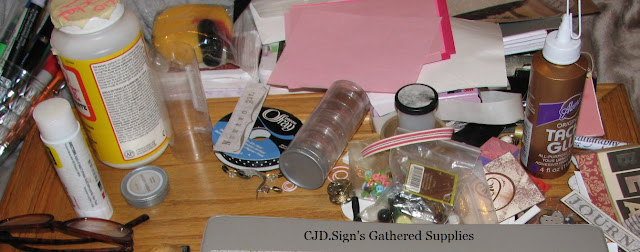 This was my gathered supplies before weeding them out.
 CJD.Sign This is my second weeding of the elements.
 Now, set out the items you chose and make the final decision on which pieces to use. Then look one more time before you glue, sick, or tape anything on. I used black ink to edge the butterfly.
 The flower added brings another layer of dimension. Keep building the cover with the choses elements, layering some of these elements.
 Use these clips to keep the paper clamped to the frame until it is dry.
 This shows what and where I put the different elements. I don't know what these papers brand are; I had them in my paper stash.
 When the front journal cover is completely dried, use a strong glue like "Gorilla clear glue" to adhere the cover to the front of the journal.This particular glue has to be used on damp surfaces. So, I used a damp sponge and wiped across the back of the journal cover and the journal front areas where I wanted them to stick. Then use the glue on only those areas. Use the little clamps or these paper clips to hold the journal edges together. Place 4 heavy cans on the corners of the journal cover to hold it all down. Leave a bit longer than you think to make sure it is dry. The glue bottle has that time listed on the directions.
That's it for the fourth post.

Here is the link to the first post: LINK

On To The Cover!!


 |
| flipped face down to show the pinch lines. |


 |
| Take the frame and measure out the pieces of patterned papers to use. I like the Theater information on the gridded paper and placed it to the lower edge of the frame. Below |


 |
| Use the Tacky Glue on the back of the frame to ensure adherence. (see above) |


 |
| I found that wrapping the piece of paper around the frame gave a better edge finish. I found these tiny hair clips at the dollar store and they work great as mini clamps. (above) |


 When the front journal cover is completely dried, use a strong glue like "Gorilla clear glue" to adhere the cover to the front of the journal.This particular glue has to be used on damp surfaces. So, I used a damp sponge and wiped across the back of the journal cover and the journal front areas where I wanted them to stick. Then use the glue on only those areas. Use the little clamps or these paper clips to hold the journal edges together. Place 4 heavy cans on the corners of the journal cover to hold it all down. Leave a bit longer than you think to make sure it is dry. The glue bottle has that time listed on the directions.
That's it for the fourth post.

Here is the link to the first post: LINK
Here is the link to the second post: LINK
Here is the link to the third post: LINK
Stay tuned... I have 5 more to make! I will add final photos when I get them each finished!
Here is the link to the third post: LINK
Stay tuned... I have 5 more to make! I will add final photos when I get them each finished!
Enjoy!
God Bless You!
God Bless You!

Aside from email, social media is another great way to pick up updates from me.
Follow me on Twitter
Like my Facebook page
Pin my Pics on Pinterest
Follow me on Pinterest
Follow me on Instagram
http://customgemcutter.com


.JPG)

Comments
Post a Comment