Fall and Thanksgiving Centerpieces
Hi, Sweet Friends,
These cute Fall and Thanksgiving Centerpieces are just the quick color pop to any table, corner, or counter. That is exactly where these cute little bouquets ended up being.
You will need:
1 large container, bucket, vase, or galvanized container
4 Mason Jars
Pumpkins; 1 cloth (Target), 1 medium burlap (Target), 2 small Burlap Ribbon, wired (Dollar Tree)
3 bundles (stem clusters) of each color flowers. These are from Dollar Tree.
1 roll of patterned wired burlap ribbon
wire cutters
scissors
bags of dry beans; white beans, red beans, black beans, and pinto beans or even a bag of split green peas
At first, I just used this little cute bucket just empty. Gradually it got filled with pumpkins and more things Fall.
Finally, this little guy got some cream, gold, and yellow mums, a burlap pumpkin (perched on an inverted mug in the base of the bucket) and a laser-cut "thanks" is tucked in.
I found my little bucket at Murdock's in Colorado. I have found similar at the higher-end florists & garden supply shops.
Pumpkins can land any place, like on this plate!
Here, I popped in a candle from a Glade home candle and laid a leaf from the flowers on the saucer.
Here are some of the supplies I found at the Dollar Tree for Fall.
I found some great Fall items that went very well with the theme for the year. "Cheery Fall".
This tutorial is a bit WONKY. By that I mean, as I made these, I took photos of the process. So this post is exactly how I made them and where I have used them.
I liked the lightness of the "Thankful Pumpkin", the cloth pumpkin, and the ivory and butter-colored Mums. Here I have set the extra placemats under my cake stand. I topped it with a bit of wide ribbon, placed the platter on top, and added the decorations. A yummy Carmel Candle is just the smell good for the table.
I actually kept the flower stems all in this large jar for almost a week. Just until I had a moment to sit and make the arrangements.
These pumpkins are wonderfully cute! I found them and the laser-cut words at Target in the 1$ bins.
So the first thing I did was remove all the stems from the center large cluster of stems with a pair of wire cutters.
I popped them in the jars to keep them looking nice and not so frumpled as when they lay on the table.
I then took a break! Yea!! A cup of yummy Spiced Pumpkin Chai with a touch of cream. Hubby said I have the life of luxury. I think he may be right!
 |
| Remember the bucket from before? Well, I added these cained balls, feathers, and set it on the entry table. |
 |
| I grouped the flowers together by color, then I took one of each to start each bouquet. |
I then took the ribbon, measured it around the mason jar top, snipped the wire a bit past that (both edges have wire),
 |
| Measure the ribbon around the jar top and a bit more. |
 |
| Nip the wire on both sides with the wire cutters. |
Fold both of the wires over on one end and secure to the ribbon end. Then take the wires at the other end of the ribbon and pull them about an inch out of the ribbon. See the photo up above.
Overwrap the ribbon as shown above. Take the two wires and poke them thru the ribbon at the overlapping points.
Tuck the wires underneath the ribbon. Bend them down so they stay put.
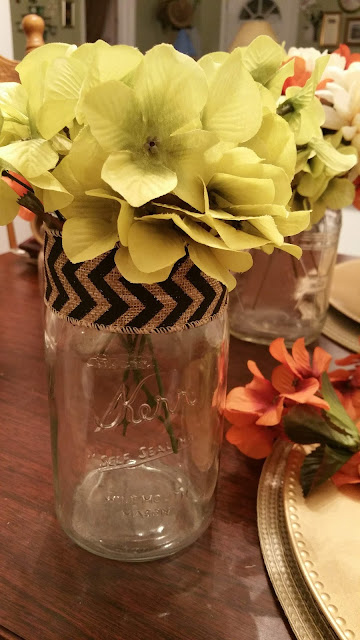
Place the ribbon on the jar like above. Do this for all the jars you are using. They look so CUTE!!
Ok, now on to the flowers...
 |
| I put one of each color in the jar first. Then I added more until the desired look. |
 |
| Gathering the stems into a bouquet before placing them into the jars is another option of making these beauties! |
 |
Start with one of each color flowers and add more till your desired look has been accomplished. |
Making them similar, but not exactly like each other, will give a visually pleasing effect.
They look cute like this, but I added beans and lentils of different colors to enhance the colors and make the jars pop!
another look at 3 of these beauties!
I placed them around the house, with one in the guest room and a smaller version in the bathrooms.
I just love these colors together, they are an inviting piece of Fall
Aren't these so cute?!!
Make them as you want. Be creative!
I made this green flowered one for our bedroom.
 |
| As always, be thankful for the little things as well as the big things. |
The fine print: Please link with love! As with all of our posts, DIY projects featured on Styling With CJD.Sign may not be copied, distributed or reproduced without express written permission.
Love and links are always appreciated!
If you’d like to share this post, please link to this post directly for the DIY tutorial and do not include the instructions in your own post. All photos on this post are by CJD.Sign. Please give credit. Thanks so much! oxo CJ
 |
| Custom Gem Cutter |


.JPG)

Comments
Post a Comment