DIY Bird Bath Gets New Life
Hi Friends,
The Summer has finally slowed enough for me to do some of my much needed and neglected projects. Today we are sand painting a bird bath!
Now this project cost me a total of:
Bird Bath - Yard Sale Find: $5
Drop Cloth - Dollar Tree: $1
Primer Paint - WalMart: $4
Finish Paint - WalMart: $6
Clear Plastic Glove - FREE!
Project Total: $16 Verses a New Stone Bird Bath $135!
Total Savings: $119.00!!!!!!
Here's how I did it.
Have your items laid out close by your work area. Spread out your shower curtain liner; over the plants or flowers, too, if you are working in a tight space. Put the glove on the hand you will be holding onto the spray can with.
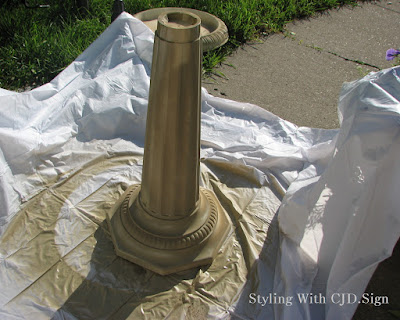
Using the Primer first (Rust-oleum in Camouflage), spray in an up and down pattern all around the base of the Bird Bath. Then go around the bottom base. See photo
Using the Primer first, Camouflage, spray the edges of the Bird Bath. Then spray just the raised round center. I did not want the spray paint in the actual bird bath.
Do just one coat.
Let this dry for about half a hour or more.
Using the plastic glove saves time and hassel of removing the paint.
Next is the Rust-oleum textured multicolored spray paint. I used a shade that went well with the sandy taupe I have on my flower pots. This will be called the top coat or final finish coat.
Respray all the primed surfaces with the top coat textured paint in the same way done with the primer. I let this coat dry over night before I put the water in it.
Enjoy!
CJD.Sign
Our Sponsor: Custom Gem Cutter
The Summer has finally slowed enough for me to do some of my much needed and neglected projects. Today we are sand painting a bird bath!
Now this project cost me a total of:
Bird Bath - Yard Sale Find: $5
Drop Cloth - Dollar Tree: $1
Primer Paint - WalMart: $4
Finish Paint - WalMart: $6
Clear Plastic Glove - FREE!
Project Total: $16 Verses a New Stone Bird Bath $135!
Total Savings: $119.00!!!!!!
Here's how I did it.
Have your items laid out close by your work area. Spread out your shower curtain liner; over the plants or flowers, too, if you are working in a tight space. Put the glove on the hand you will be holding onto the spray can with.
Using the Primer first (Rust-oleum in Camouflage), spray in an up and down pattern all around the base of the Bird Bath. Then go around the bottom base. See photo
Using the Primer first, Camouflage, spray the edges of the Bird Bath. Then spray just the raised round center. I did not want the spray paint in the actual bird bath.
Let this dry for about half a hour or more.
Using the plastic glove saves time and hassel of removing the paint.
Next is the Rust-oleum textured multicolored spray paint. I used a shade that went well with the sandy taupe I have on my flower pots. This will be called the top coat or final finish coat.
Respray all the primed surfaces with the top coat textured paint in the same way done with the primer. I let this coat dry over night before I put the water in it.
I also rinsed the bird bath several times to get out any residue in the actual drinking/bathing area.
I really love the way this project turned out! I hope you try something new today!Enjoy!


.JPG)

Comments
Post a Comment