Desk Organizer Tutorial Part 1~ Creative Day Thursday

Hi Friends!

Today we are starting Part 1 of 3 Desk Organizer Tutorials. This is a fun DIY and uses recycled boxes, toilet paper rolls, clothing tags, stickers, elements, ribbon and 12 x 12 papers.
 This tray took 8 rolls, a small square box and a slender rectangle box that fit inside the bottom box "lid" from a shoe box.
 For this part you will need:
~1 rectangle box
~Double stick tape

~a paint sponge or brush
~Glue

~2 caps (1 with glue we will use on this tutorial part & 1 with water, to use on the tubes, lid and ribbon in the next tutorials)
~2 patterned 12 x 12 Scrapbook Papers
~Scissors
First, the long rectangle box needs to be prepped. Place double stick tape on the inside of each flap.
I found it easier to have the box on its side for this part.
Fold each side in and press firmly.
The next step is to measure the patterned paper for the box.
One sheet would fit part way around the box.
Folding and finger pressing the edge to be cut off, ensures for a nice clean line to follow with the scissors.
Open the paper and cut on the fold, as shown above.
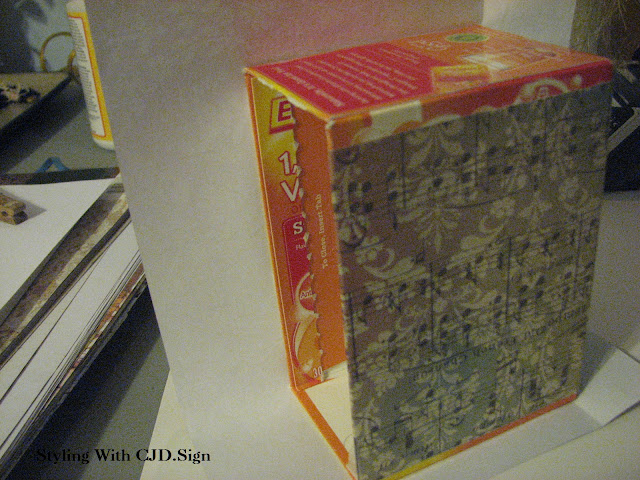
This box needed an extra piece to cover the whole box. I measured that area and cut a piece a bit larger to make sure it would over lap.

Here are two pieces ready to glue. Having the small edge folded, gives a nice crisp edge when gluing and no gluey fingers.
Remove the paper and Glue Only the side of the box.
lay the smaller paper piece over the box and finger press the edge.Using ONLY the glue, coat the first side of the box.
Lay on that first smaller paper with the edge snugged tightly. After gluing the side, glue the bottom underside of the paper and press to the bottom.

Glue the top flap on the paper underside and fold into the top and press firmly.
Using the glue Only, cover the other side of the box as shown. Press longer patterned paper on top and snug up the folded edge on the bottom side.
Now put glue on the sides and press firmly. Above shows to leave a bit extra for the overlay of the 2nd patterned paper.
With glue Only, paint glue on the last end.
Finger press as you go around each side to ensure a nice crisp fit.
Finger press the edge overlap and glue in place.
Do the same with the last edge overlap.
Glue the bottom edge under the paper as shown. This is where we will make a folded box bottom with the remaining bottom patterned paper.
Press down the edge and make a finger press point, as shown above. Do the same to the other side.
Finger press the sides over and finger press the last edge up.
Glue each side and press firmly to the box bottom.
The bottom should look like this.
Glue the last flap and press firmly in place.
Make sure you coat the overlap edges too.
The finished bottom of the box should look like this. I know it will be glued to the lid, but the fit like this ensures a nice looking box.
Glue the edges only of the top piece and fold it inside.
Glue the over laps down. and Press it all firmly.
Your box is finished.
Set it aside to dry.
My second box will remain as it is, but if need be do the same as the instructions above for this box too.
This is the first two boxes. Next is the bottom "LID" box that all the boxes and covered tubes fit into.
Here you'll use the water to wet the brush each time, before putting it in the glue. The glue will be too thick on this if used only. The water thins it out.
Cut three (3) long strips about 3 inches wide.
Fold them each down the middle and finger press.
They will look like this. You will be overlapping the ends when gluing, so you only need 3 pieces. If your box is longer, just use that last one to overlap any uncovered area.
These pieces will "cap" the edges and make them look nice.`
The photo says "Mod Podge"; essentially, that is what the water does when mixed with the glue on the brush.
Start on one long edge and press down the paper as you go. Overlap the edges.
Do the same water & glue method on the inside edges to hold the paper flat and the outside edges. Glue the over lapped edges down.
And the next part will be #3 and I'll make the covered tubes and put it all together.
Enjoy!
CJD.Sign


.JPG)

Comments
Post a Comment